Get A Free Quote

We will get back to you within 8 hours

Name
Leave a message for purchasing needs or products of interest.
Drop files here or
Max. file size: 20 MB, Max. files: 10.
    For customized products or solutions, simply submit your needs document above. We’ll deliver your best-suited solution within 24 hours.
    Five types of chemical stains on granite — acid etch, rust, oil, hard water, and dye stains

    How to Remove Chemical Stains from Granite: Expert Step-by-Step

    Chemical stains on granite are not just an aesthetic problem — they can penetrate deep into the stone’s pores and become permanent if treated incorrectly. The wrong cleaning product or technique can make the stain worse, etch the surface, or strip the existing seal.

    This guide specifically addresses chemical stains — those caused by reactive chemical contact with granite’s mineral structure — as distinct from surface dirt, soap film, or general soiling. It identifies the five most common chemical stain types on granite and provides the exact removal method for each one, including when a professional poultice is required and when a surface treatment is enough.

    Why Granite Stains Differently Than Other Stone

    Granite is one of the hardest natural stones (6–7 on the Mohs scale), but it is not impervious to staining. Its crystalline structure contains microscopic pores and natural fissures that can absorb liquids — especially in areas where the sealer has worn thin.

    Key facts:

    – Polished granite has tighter pores and resists staining better than honed or flamed granite

    – Light-colored granites (white, beige, cream) show stains more visibly and absorb them faster than dark granites

    – A properly applied penetrating sealer typically provides a working window of approximately 15–30 minutes for liquid spills — though this varies significantly by sealer quality and stone porosity

    – Chemical stains penetrate differently than organic stains — they often react with the minerals in the granite, making surface wiping ineffective

    Understanding the stain type is essential because each type requires a different chemical approach for removal.

    Five types of chemical stains on granite — acid etch, rust, oil, hard water, and dye stains

    How to Identify Your Stain Type

    Before choosing a removal method, use the visual characteristics below to identify which stain type you are dealing with. Selecting the wrong chemical agent will not remove the stain and may introduce secondary damage.

    Visual AppearanceLocation / ContextLikely Stain TypeGo to Section
    Dull, lighter-colored spot or ring; surface feels slightly rough or recessed to the touchWhere acidic liquids contacted stone — kitchen countertop near citrus, bathroom near tile cleanersAcid EtchingType 1
    Orange, brown, or reddish-brown spots or streaksNear metal fixtures, furniture legs, or appearing “from inside” the stone with no external sourceRust StainType 2
    Dark, wet-looking patch that does not dry; appears to be beneath the surfaceKitchen areas near cooking zones, cosmetics, or petroleum productsOil / Grease StainType 3
    White, chalky, or cloudy film or ringsAround faucets, sinks, shower areasHard Water DepositType 4
    Colored spots — purple/red, brown, yellow, blue-greenWhere beverages, food dyes, ink, or fabric dye contacted the stoneDye / Pigment StainType 5

    Quick test: Run your fingertip lightly across the affected area. If the surface texture has changed — feels slightly rough or depressed — you are likely dealing with acid etching (Type 1), which is surface damage rather than a stain. This distinction is critical: stain removers will not restore an etched surface, and applying them wastes time while the damage sets further.

    5 Chemical Stain Types and How to Remove Each

    Stain Type 1: Acid Etching (Vinegar, Lemon, Bathroom Cleaners)

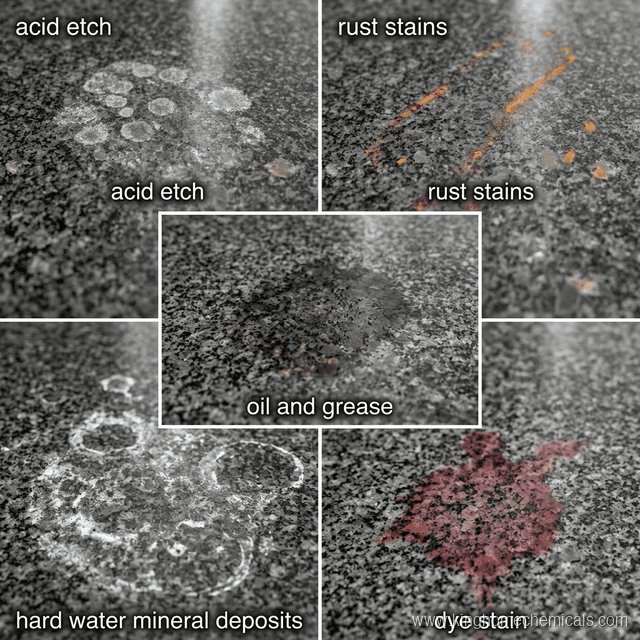
    What it looks like: Dull, lighter-colored spots or rings where the polished surface has been chemically dissolved. Not a surface stain — it is actual surface damage.

    The critical distinction — etching vs. staining:

    Many users mistake acid etching for a stain and apply cleaning products, which does nothing to restore the surface and may compound the damage. Here is how to distinguish between the two:

    • Etching: The surface texture has changed. Run your fingertip across the affected area — you can feel a subtle roughness or slight depression compared to the surrounding polished surface. Hold a flashlight at a low angle (raking light) across the surface: the etched area will appear hazy or dull while the surrounding stone remains reflective.
    • Staining: The surface texture is unchanged and feels smooth. The discoloration is within the stone but the surface has not lost its polish.

    If you have confirmed this is etching, do not apply stain removers — they are not formulated to restore surface polish and will not address the damage.

    Why it happens: Acids react with the feldspar and calcium-bearing minerals in granite, dissolving the polished surface layer. Even brief contact with citrus juice, vinegar, or acidic bathroom cleaners can etch polished granite.

    Removal method:

    1. Clean the area with a pH-neutral stone cleaner and water
    2. If the etch mark is light, apply a granite polishing compound using a soft cloth in circular motions. Our Granite Gloss Restorer with ultra-fine diamond abrasive is specifically formulated for this
    3. For deeper etching, use progressively finer diamond polishing pads (400 → 800 → 1500 → 3000 grit) with a hand polisher
    4. After restoring the polish, apply a penetrating sealer to the affected area

    Prevention: Always use pH-neutral cleaners on granite. Never use vinegar, bleach, or ammonia-based products.


    Stain Type 2: Rust Stains (Iron Oxidation)

    What it looks like: Orange, brown, or reddish-brown spots or streaks. Often appears near granite edges, around metal fixtures, or seemingly “from within” the stone.

    Why it happens: Granite naturally contains iron-bearing minerals (pyrite, biotite). When exposed to moisture, these minerals oxidize and produce rust that migrates to the surface. External sources include metal furniture legs, iron brackets, and steel wool residue.

    Removal method:

    1. External rust (from metal objects on the stone): Remove the source of iron contact. Clean the area thoroughly. Apply a dedicated Granite Rapid Rust Remover — these products are formulated with chelating agents that lift iron oxide without damaging the granite surface
    2. Internal rust (from minerals within the stone): This is more challenging. Apply a poultice made from rust-removing compound and diatomaceous earth. Cover with plastic wrap, tape the edges, and allow 24–48 hours. Remove the poultice and evaluate. Multiple applications may be needed
    3. After treatment, reseal the area with a penetrating sealer to slow future oxidation

    Important: Never use generic rust removers (CLR, naval jelly) on granite — they contain hydrochloric acid that will etch and permanently damage the surface.


    Stain Type 3: Oil and Grease Stains

    What it looks like: Dark, wet-looking patches that do not dry. The stain appears to be beneath the surface. Common in kitchen countertops near cooking areas.

    Why it happens: Cooking oil, butter, grease, cosmetics, and petroleum products penetrate granite pores easily because oil has lower surface tension than water, allowing it to be absorbed faster and deeper.

    Removal method:

    1. Blot (never wipe) excess oil immediately — wiping spreads the stain
    2. Apply a generous amount of an absorbent powder (baking soda, cornstarch, or diatomaceous earth) to the stain. Let it sit for 24 hours to draw out oil from the surface
    3. For deeper stains, create a poultice: mix the absorbent powder with acetone (for light-colored granite) or mineral spirits (for dark granite) to the consistency of peanut butter
    4. Apply the poultice 6mm thick over the stain, extending 15mm beyond the stain edges
    5. Cover with plastic wrap and tape edges. Allow 24–48 hours for the poultice to dry completely
    6. Remove the hardened poultice with a plastic scraper. Clean the area with pH-neutral cleaner
    7. For persistent grease, a professional Oil Stain Cleaner designed for stone surfaces provides stronger degreasing action without damaging the seal

    Stain Type 4: Hard Water and Mineral Deposits

    What it looks like: White, chalky, or cloudy film or rings on the granite surface. Often appears around faucets, sinks, and shower areas.

    Why it happens: Hard water contains dissolved calcium and magnesium. When water evaporates, these minerals are left behind as a solid deposit on the stone surface. Over time, deposits can bond chemically with the stone, making them extremely difficult to remove.

    Removal method:

    1. For light deposits, use a dedicated Water Spot Remover that uses targeted surfactants to penetrate and dissolve mineral buildup without acid
    2. Apply the product directly to the deposit, allow 5–10 minutes of dwell time
    3. Agitate gently with a nylon brush or non-scratch pad

    4. Rinse thoroughly with clean water and dry immediately

    1. For heavy buildup, repeat the application 2–3 times. Between applications — on polished granite only — you may use a fine (0000-grade) steel wool pad to help break up thick deposits. Do not use steel wool on honed, leathered, or flamed granite finishes — it will cause visible scratching that cannot be reversed without professional re-polishing
    2. After removal, seal the area to resist future deposit formation

    Never use vinegar or lemon juice to remove hard water spots from granite — the acid will create a bigger problem (etching) than the one you are solving.


    Stain Type 5: Dye and Pigment Stains

    What it looks like: Colored spots or patches — purple/red (wine), brown (coffee/tea), yellow (turmeric), blue/green (ink, dye). The stain may appear to be on the surface or absorbed into the stone.

    Why it happens: Colored organic and synthetic compounds penetrate the pores of unsealed or poorly sealed granite, binding to the mineral structure.

    Removal method:

    1. For surface-level dye stains, apply a standard 3% hydrogen peroxide solution (the concentration available at most pharmacies) directly to the stain. Allow 10–15 minutes of dwell time, then blot and rinse. This works well on light-colored granite for organic dyes such as wine, coffee, and tea. Higher-concentration hydrogen peroxide is used in professional stone care products — follow the product instructions carefully and take appropriate precautions if using a professional-grade formulation
    2. For deeper stains, create a hydrogen peroxide poultice: mix 3% hydrogen peroxide with flour or diatomaceous earth. Apply, cover with plastic, and allow 24–48 hours
    3. For synthetic dyes (ink, fabric dye), use acetone or lacquer thinner applied via poultice
    4. For stubborn multi-compound stains, a professional Stone Stain Remover with stain-suspending technology can lift complex stains that simple poultices cannot

    The Universal Poultice Method — Step-by-Step

    A poultice is the most effective deep-stain removal technique for granite. Here is the standard procedure:

    Materials needed:

    • Absorbent powder (diatomaceous earth, kaolin clay, or flour)
    • Active chemical (acetone, hydrogen peroxide, mineral spirits, or product-specific cleaner — matched to stain type)
    • Plastic wrap and masking tape
    • Plastic scraper
    • pH-neutral stone cleaner

    Steps:

    1. Clean the stained area with pH-neutral cleaner and dry completely
    2. Mix the absorbent powder with the active chemical to a thick paste consistency (like peanut butter)
    3. Apply 6mm thick over the entire stain, extending 15mm beyond the stain edges

    4. Cover with plastic wrap and tape all edges to slow evaporation

    1. Allow 24–48 hours for the poultice to draw out the stain. The paste will dry and pull the stain upward
    2. Remove hardened poultice with a plastic scraper (never metal)
    3. Clean the area with pH-neutral cleaner and water
    4. Evaluate — deep stains may require 3–5 poultice applications
    5. After successful stain removal, apply penetrating sealer to restore protection

    Why Poultice Treatments Fail — And How to Avoid It

    Even when the technique is correct, poultice treatments often fall short. These are the four most common failure causes:

    1. Removing the poultice before it is fully dry

    This is the most frequent mistake. The drawing mechanism requires the paste to dry completely — as moisture evaporates, it carries stain molecules upward into the paste. If you remove the poultice while it is still soft or cool to the touch, the extraction process stops mid-way. The stain may be partially redistributed within the stone rather than drawn out. When in doubt, leave it for an additional 12 hours before checking again.

    1. Inadequate plastic wrap sealing

    Taping the plastic wrap edges is not optional. If the wrap is loose or the tape has gaps, the poultice dries within a few hours rather than the required 24–48 — losing its drawing power before the stain has time to migrate upward. Press the tape firmly along all four edges, including any overlap seams. The poultice should remain damp throughout the dwell period; if you check at the 12-hour mark and it has already fully hardened, the seal was insufficient.

    1. Mismatching the chemical agent to the stain type

    Each chemical agent targets a specific stain chemistry. Acetone dissolves oil-based compounds and certain dyes — it does not affect mineral salt deposits. Hydrogen peroxide oxidizes organic pigments — it does not chelate iron oxide. Applying the wrong chemical to a stain will produce no result regardless of how long the poultice sits. Always identify the stain type using the table at the top of this guide before selecting your chemical agent.

    1. Not cleaning thoroughly between applications

    If a previous poultice application left residue dried into the pores, the next application cannot make full contact with the stain. Between applications, clean the area thoroughly with pH-neutral cleaner, rinse with clean water, and allow to dry completely before applying a fresh poultice. Applying a second poultice over residue from the first is one of the most common reasons repeated treatments appear to have no cumulative effect.


    When to Call a Professional

    Some granite stain situations require professional stone restoration rather than DIY treatment:

    • Deep acid etching that has removed the polished surface across a large area: When etching covers a significant portion of a surface or spans multiple panels, consistent re-polishing requires industrial diamond equipment. Attempting DIY polishing across a large area with hand tools typically produces uneven gloss levels that are more visually apparent than the original etching.
    • Internal rust that keeps returning despite repeated treatment: If rust reappears after two or three separate poultice treatment cycles, this indicates active, ongoing oxidation within the stone’s mineral structure. Each treatment only extracts rust that has already migrated to the surface; the source oxidation continues. A professional assessment can evaluate whether stabilization or surface coating is appropriate for the specific stone.
    • Stains that have been set by heat, incorrect cleaning products, or long exposure (months or years): Heat accelerates the chemical bonding between stain molecules and granite minerals. Similarly, stains present for extended periods — or those that were previously treated with the wrong product, particularly acid-based products — may have undergone secondary chemical reactions that require professional-grade extraction methods.
    • Multiple stain types on the same area requiring different chemical approaches: Treating overlapping stains requires careful sequencing — applying chemicals in the wrong order can create new reactions or fix one stain type deeper into the stone while attempting to remove another. A professional can assess the composite situation and apply treatments in the correct order.
    • Countertop edges and seams where stains have penetrated behind the stone: These areas cannot be effectively treated from the surface alone and require specialized access.

    Professional restorers use industrial diamond polishing equipment, commercial-grade poultice systems, and application techniques that deliver results home methods cannot match. For more on professional stone care, see our granite floor cleaning guide.


    Frequently Asked Questions

    Can you use bleach on granite?

    No. Bleach (sodium hypochlorite) should not be used on granite. While it does not etch the surface the way acids do, bleach degrades penetrating sealers over time and leaves the stone progressively more vulnerable to staining. Repeated use can also discolor light-colored granite. For sanitizing granite surfaces, use a stone-safe neutral pH cleaner or a disinfectant specifically formulated for natural stone — check the product label to confirm it is safe for sealed granite.

    Does acetone damage granite?

    Acetone does not etch or permanently damage granite when used correctly as part of a poultice treatment. It is a solvent that dissolves oil-based compounds and certain dyes without reacting chemically with granite minerals. However, repeated acetone use will progressively strip penetrating sealers from the treated area, so reseal the surface after any acetone-based poultice treatment. One additional consideration: on very dark-colored granite, acetone can occasionally leave a slight lightening effect on the treated spot. Mineral spirits are a safer solvent choice for oil stain poultices on dark granite.

    How do I know if my granite is sealed?

    Use a water bead test: place a few drops of water on the granite surface and leave undisturbed for five minutes. If the water beads up and sits on the surface, the sealer is intact. If the drops absorb into the stone and darken the surface, the sealer has worn thin and resealing is needed. For kitchen countertops in active cooking areas, perform this test every six to twelve months — heat, cleaning products, and daily use accelerate sealer degradation in these zones.

    How long before a granite stain becomes permanent?

    There is no single answer, as the timeline depends on the stain type, the stone’s porosity, and whether the surface is sealed. As a general principle: the faster you act, the shallower the penetration. Oil stains on unsealed granite can penetrate deeply within the first thirty minutes. Acid etching is instantaneous — the surface damage occurs on contact. Dye stains from wine or coffee on sealed granite can often be treated effectively if addressed within a few hours, while the same stain left overnight becomes significantly harder to remove. Rust stains from internal minerals develop gradually over weeks or months and are the most difficult category to reverse with DIY methods at any stage.

    Why do rust stains appear from inside granite with no external metal source nearby?

    Granite is an igneous rock that naturally contains iron-bearing minerals — pyrite, biotite, and hornblende are among the most common. When moisture reaches these minerals (including from ambient humidity, cleaning water, or condensation beneath objects), they oxidize and the resulting rust migrates toward the surface. This is not a manufacturing defect or a quality issue with the stone — it is a natural characteristic of certain granite types. Darker granites and varieties with visible mineral flecks or veining are more prone to this. Treatment addresses the surface manifestation, but the underlying oxidation process may continue; applying and maintaining a quality penetrating sealer reduces moisture intrusion and slows the rate at which future oxidation reaches the surface.

    Leave a Reply

    Your email address will not be published. Required fields are marked *

    en_USEnglish